In this post I will tell you how to use your DSLR camera manual mode to get correct exposures. I will share 3 photography secrets that pro photographers already know. Understanding the settings of your DSLR camera will give you control over how the photos come out and will ultimately help you take better photos.
[jquery name=”googleevent” selector=”.download-pdf”]hitType: ‘event’,
eventCategory: ‘PDF’,
eventAction: ‘download’,
eventLabel: ‘3 powerful secrets dslr manual’
[/jquery]
A good photographer has to understand how the camera works. DSLR cameras offer a multitude of settings that can be intimidating if you are a beginner photographer.
I hear this a lot:
Professional photographers always shoot in full manual mode. Trust me: that is simply not true…
…but pro photographers can shoot in full manual mode because they understand how all the settings of the camera influence the resulting photo.
You know this already:
Photography is all about light. Capture the right amount of light and your exposures will be correct.
But lighting conditions are not always ideal. That is why you have to learn how to set your DSLR camera to compensate for the lack or excess of light.
Capture too much light and your photo will be overexposed. Too little light and you get an underexposed image.
Know this:
A technically correct photo is not automatically a beautiful photo. But, it’s almost always a requirement for any good photo.
This post is strictly about the technical side of taking pictures using a DSLR. So, if you are ready for the 3 secrets that will improve the quality of the pictures you take…
…let’s begin!
1. ISO Explained
The simple explanation:
The ISO setting determines the sensitivity to light of your camera’s sensor. With numbers ranging from 100 up, a higher ISO setting means the sensor is more sensitive to light.
What does that mean?
It means that a higher ISO setting will allow taking pictures in lower lighting conditions. Higher ISO will brighten the image.
But, there’s a trade off:
Because the camera will be more sensitive, higher ISO settings will also increase the granular noise in the picture.
Practical ISO Examples
Let’s see some examples of photos taken with different ISO settings.
I took two pictures in full manual mode. First one is at ISO 100. As you can see the exposure is incorrect and I got an underexposed shot (the image is too dark).

By increasing the ISO setting to 800, leaving the other settings the same and keeping the same lighting conditions, I was able to get the correct exposure on the right.
That looks better!
So, by setting a higher ISO I managed to get the correct exposure. If you look at the detail on the bottom, there is some noticeable noise. However, sometimes you have to make a compromise and accept at least some noise in the picture if that allows you to get the right exposure.
Let’s now see what happens if you abuse the ISO setting and you set it too high. For this I setup another example.
I shot two other photos. One at ISO 100 and one at ISO 1600.
This time I set the camera on a semi-automatic mode called P (Program Mode).
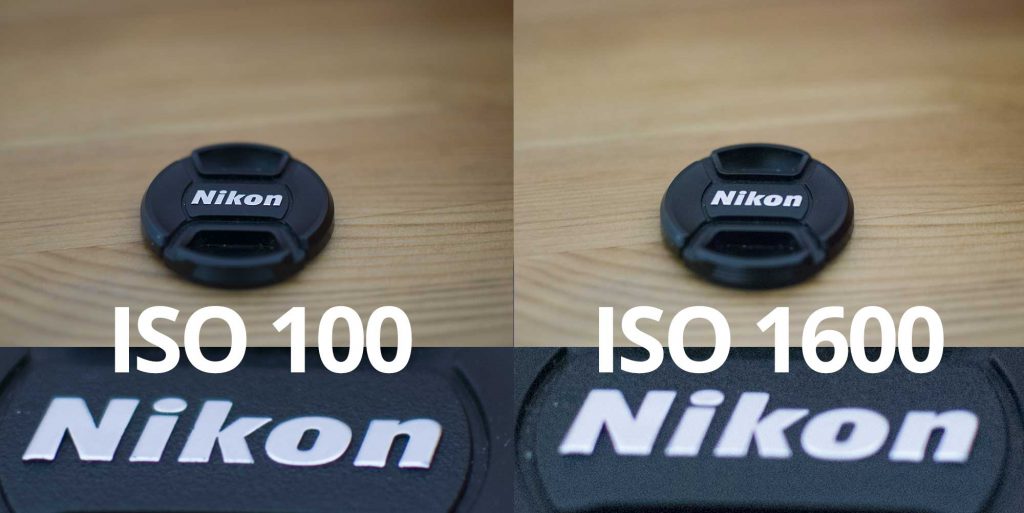
In this mode the DSLR camera will try to calculate the right exposure. I only changed the ISO and let the camera decide on the other settings. At ISO 1600 we are starting to see a lot of noise.
The ISO setting is probably the easiest setting on your DSLR camera to understand.
Keep this in mind:
In practice you will probably want to start by setting ISO 100 regardless of the camera mode settings. This will give you minimal noise.
If the photo is underexposed or blurry, then keep all the other settings the same, increase the ISO and take another shot. Do this again until you get the right exposure.
[section cssclass=”blue accent”]
SECRET #1
How to Remove ISO Noise Using Photoshop
For removing ISO noise you will need to take several shots of the subject.
Then open these shots in Photoshop using File > Scripts > Load Files into Stack… checking the Create Smart Object after Loading Layers checkbox
This will create a smart object with the shots stacked inside it. With this smart object selected go to Layer > Smart Objects > Stack Mode > Mean.
Using this technique you will highly reduce or even remove most of the ISO noise grain.
The more shots of the subject you stack, the better the result.
[/section]
When the noise is still too obvious then you’ll probably need to use one of the other photography secrets in this post.
Let’s see what’s next.
2. Shutter Speed Explained
To take a picture, DSLR cameras quickly open and close a “small door” to let light reach the sensor. The “small door” is called shutter.
Shutter speed determines how fast the shutter is opened and closed.
More specifically:
The shutter speed measures the amount of time that the camera sensor is exposed to light for taking a picture. The longer the time, the more light gets to the sensor and the image will be brighter.
Also important:
If your subject is moving you might get a blurry picture. Setting a faster shutter speed will allow you to get a sharper photo.
[section cssclass=”orange accent”]
SECRET #2
Avoid Camera Shake Using A Simple Rule
If you are not using a tripod you have to hold the camera very still when taking a shot. But even then, if the shutter speed is not fast enough you might get a blurry picture.
How fast is fast enough for the shutter speed?
I always use this rule: set the shutter speed to approximately 1/x sec where x is equal to the focal length.
For example: if I’m shooting at 50mm, a 1/50 sec or faster will be enough for avoiding the camera shake. At 300mm you need to go even faster at 1/300mm and so on.
[/section]
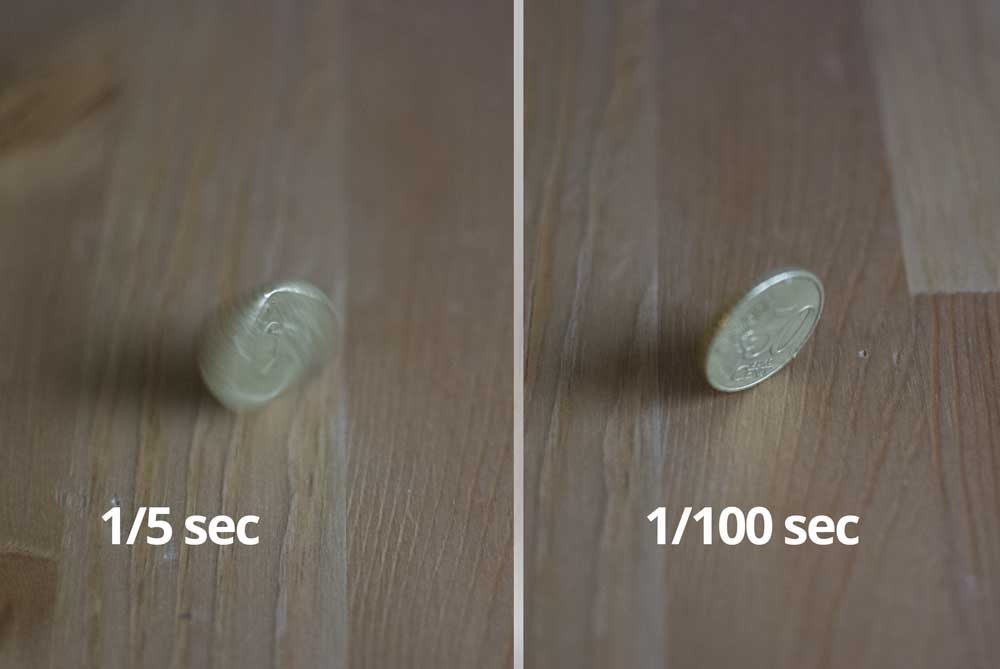
Let’s see a few examples of using the shutter speed
I took two photos of a spinning coin:
One with 1/5 seconds shutter speed and one with 1/100 seconds. Here’s the difference.
It’s all about the balance
You have to set a shutter speed fast enough to avoid blurry photos, but slow enough to get enough light to the sensor.
Remember Secret #1 – ISO
The DSLR camera settings are meant to be used together.
What if the shutter speed that gives you a good exposure is not fast enough to freeze the subject and it still looks blurry?
The solution is:
Increase the ISO. This will allow you to set faster shutter speeds and getting the same exposure levels. That is what I did in the example above to get the same level of exposure.
To sum up:
You can brighten an exposure using a slower shutter speed. And you can darken an exposure by setting a faster shutter speed. Also, you can eliminate blurry moving subjects with faster shutter speeds and increase the ISO to keep the correct exposure.
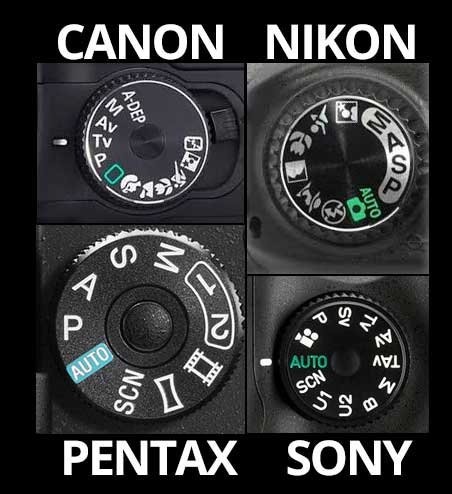
All DSLR camera have a setting mode which allow you to set the shutter speed directly. For some cameras it’s marked as S (Shutter Priority) and on other cameras it’s marked as Tv (Time Value).
Now that we understand two key concepts of photography, we are moving from full auto to semi-automatic mode.
Just one more step to mastering full manual mode.
3. Aperture Explained
Aperture measures how wide the lens is opening when the shutter is opened. A wider opening lets more light in.
Quick remark:
The aperture setting is given as a so called “f-number”. Not to be confused with the “f-word” 🙂
All you need to know is:
The value of the aperture is an inversely proportional number to the area of the lens opening. For example, an F/2 setting means an opening larger than an F/4.
Confused? Don’t be!
The math and optics formulas behind this is not important. What is important is to understand how the aperture setting influences your photos.
Here’s the deal:
A higher F-number (narrow aperture) means that the camera sensor receives less light. A lower F-number (wide aperture) lets more light reach the sensor.
So, if your photo is underexposed, you can set a lower F-number to get more light in.
But how low can the F-number be?
That depends on the lens you use. The lowest F-number available for a lens is part of the name of the lens.
For example: the AF-S Nikkor 35mm 1.8 lens I’ve used for the photos in this post has a minimum F-number equal to F/1.8.
So, setting the aperture to F/1.8 will give me the maximum opening of this lens and therefore the maximum amount of light this lens can let into the camera.
Again, there’s a catch:
Using wider aperture there is a trade off that you must be aware of. The wider the aperture, the narrower the depth of field.
Wait a moment, depth of what?
The depth of field or DOF is the effective focus range, or the area that will be in focus. When you take a photo and focus on a subject, imagine two planes parallel to the sensor: one in front and one behind the subject in focus. That is the depth of field.
The two planes can be closer or further from each other meaning a narrower or wider depth of field.
The best way to explain aperture and DOF is through an example.
I took these three photos with three different aperture settings:
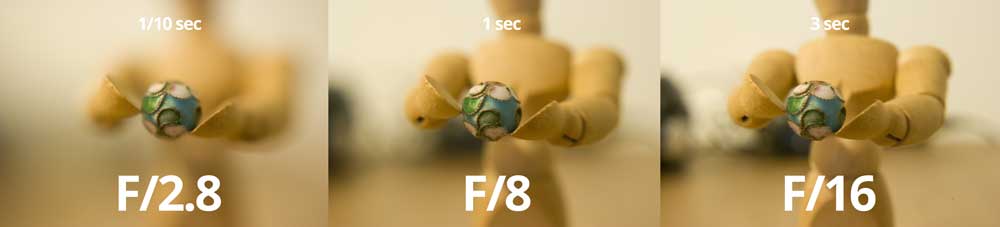
As you can see, the DOF is wider and wider as the F-number is higher. That is: more of the subject is in focus. Also, as the F-number goes up (the aperture is smaller), I need more light to compensate for the less light going to the sensor.
To do this I had to use a slower shutter speed going from 1/10 second to 1 and then 3 seconds.
[section cssclass=”magenta accent”]
SECRET #3
Aperture and Bokeh Go Together
Foreground and background are both important.
Combine a sharp subject in the foreground with a soft background and you get a beautiful photo.
The soft background is often called bokeh. Higher F-numbers will give you less of the bokeh effect.
Also, different lenses give different looking bokeh effects. The main factor in this is the number of blades that the lens has. You can check for this in your lens’ specifications.
The more blades the aperture has the rounder the highlights in the bokeh. The less blades, the highlights will tend to be more square shaped.
[/section]
Congratulations
You can now switch your DSLR camera to full manual mode. You now understand how to joggle the three powerful settings of your camera to get the correct exposure.
Mastering the manual mode allows you to control the exposure, but my advice is to only use full manual mode if all other semi-automatic modes fail to give you the result you want.
I’ll let you in on a secret:
For most of the images I shot for our free texture directory in textures4photoshop.com I used the semi-automatic P (Program Mode) and A (Aperture Priority Mode).
Why?
Because DSLR cameras today are very good in calculating the required settings for a correct exposure. I used the Aperture Priority mode for a lot of photos as I wanted to set the aperture at F/3.5, which gives me the sharpest results for my lens according to the specs.
Hope you enjoyed this post. Feel free to drop me a comment if you have any questions about photography.

This is a great tutorial, especially for beginners! But it also has some tricks for more advanced photographers like me 🙂
Thank you James! I’m glad to share everything I know